Interface Overview
A complete tour of the ASCII Motion editor and all its features.
Editor Layout
The ASCII Motion editor is organized into five main areas:
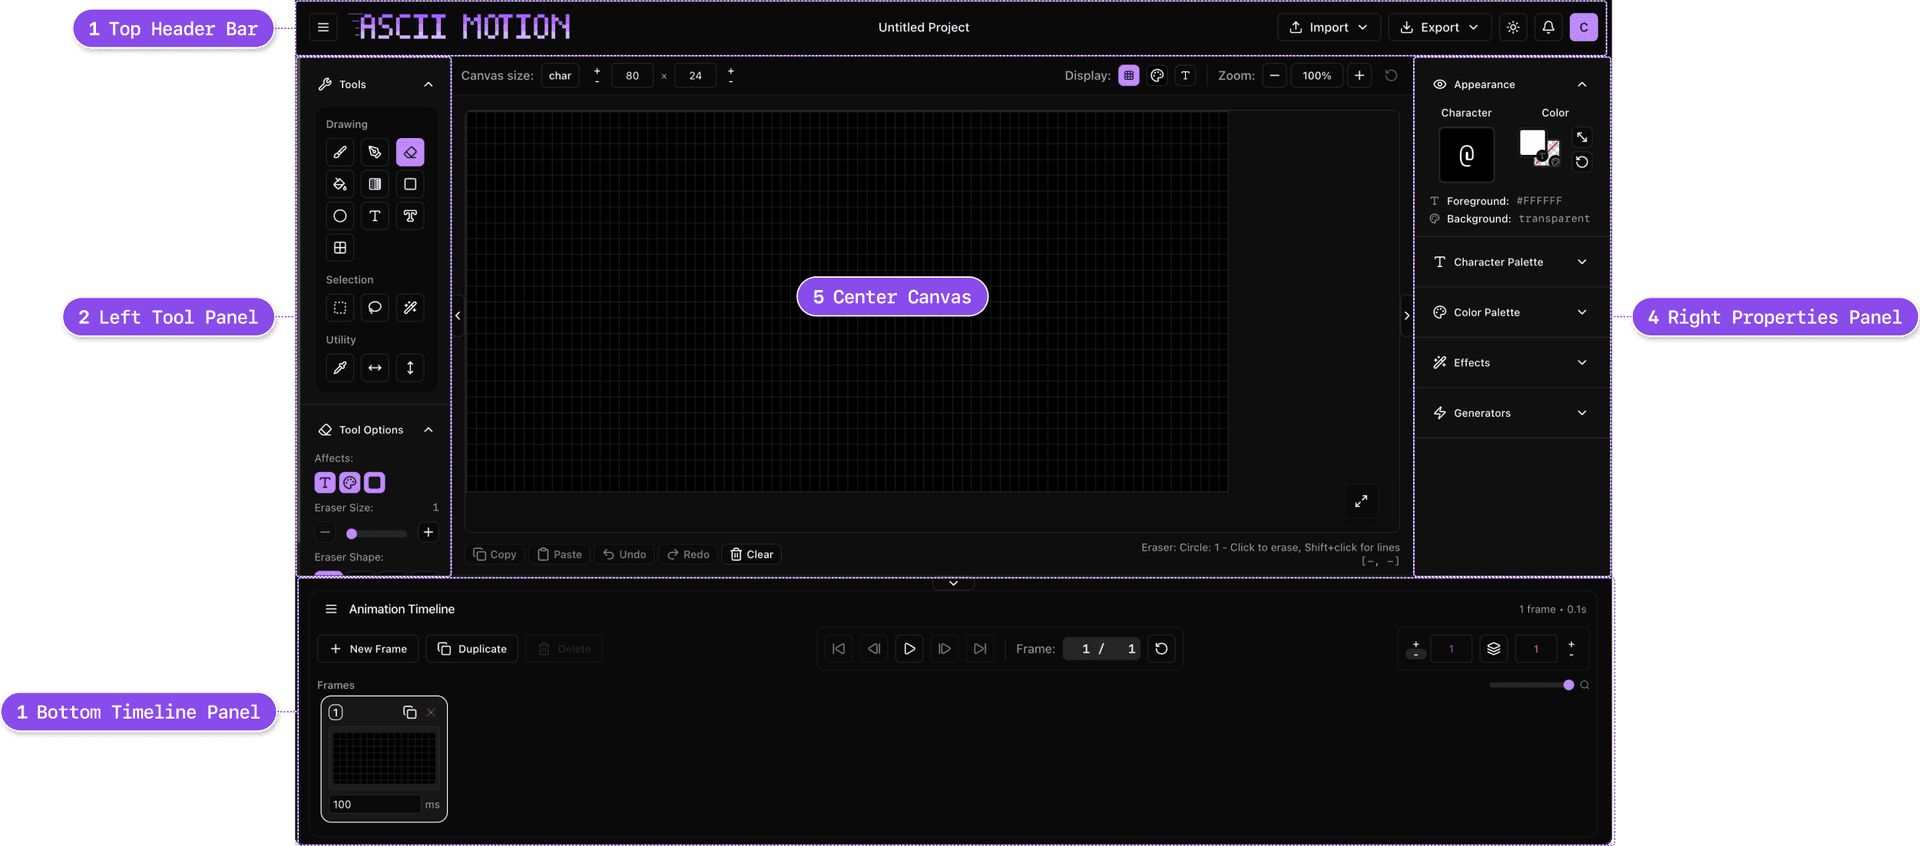
1. Top Header Bar
The top bar contains:
- Hamburger menu (☰) - Access to project management, settings, and help
- Project name (click to edit inline)
- Undo/Redo buttons
- Export button
- Theme toggle (light/dark mode)
- User profile menu (when signed in)
2. Left Tool Panel
All drawing and selection tools organized by category:
- Drawing tools - Brush, shapes, fill, gradient, text
- Selection tools - Rectangle, lasso, magic wand
- Utility tools - Eyedropper, flip horizontal/vertical
- Tool Options - Context-sensitive settings for active tool
3. Center Canvas
Your main workspace:
- Grid overlay (toggle in project settings)
- Zoom controls (bottom-right)
- Pan with Space + drag
4. Right Properties Panel
Active style and creative tools:
- Appearance - Current character preview with FG/BG color
- Character Palette - Preset and custom character sets
- Color Palette - Text and background color swatches
- Effects - Apply visual effects to selections
- Generators - Create patterns and procedural content
5. Bottom Timeline
Animation controls:
- Layer list with visibility, solo, lock controls
- Content frame blocks with drag-to-reorder
- Property track keyframes
- Playback controls (play/pause, frame navigation)
- Onion skin toggle
- FPS slider
Top Header Bar Details
Hamburger Menu (☰)
The hamburger menu provides access to all project operations:
Project Management:
- New Project - Create a new canvas
- Save Project (
Cmd+S/Ctrl+S) - Save to cloud (requires sign in) - Save As... (
Cmd+Shift+S/Ctrl+Shift+S) - Save with new name - Open Project (
Cmd+O/Ctrl+O) - Open from cloud
Settings & Help:
- Project Settings - Canvas size, background color, grid options
- Show Welcome Screen - Replay the intro tour
- Keyboard Shortcuts - View all shortcuts
- About - Version info and credits
Project Name
Click the project name in the header to edit it inline. Changes are saved automatically when you click away or press Enter.
Action Buttons
| Button | Shortcut | Description |
|---|---|---|
| Undo | Cmd+Z / Ctrl+Z | Undo last action |
| Redo | Cmd+Shift+Z / Ctrl+Shift+Z | Redo undone action |
| Export | (click button) | Open export dialog |
Left Tool Panel
Drawing Tools
Click a tool or use its keyboard shortcut to activate it. The selected tool is highlighted in purple.
| Tool | Shortcut | Description |
|---|---|---|
| Brush | B | Draw freehand with customizable brush size and shape |
| Bezier Pen | P | Draw bezier curves and vector shapes |
| Eraser | E | Remove characters (hold Ctrl while using Brush for quick access) |
| Fill | F | Fill connected areas with character/color |
| Gradient | G | Apply gradient fills |
| Rectangle | R | Draw rectangles and squares |
| Ellipse | O | Draw circles and ellipses |
| Text | T | Type text directly on canvas |
| ASCII Type | Y | Create stylized ASCII text |
| ASCII Box | Q | Draw boxes and tables with line characters |
Selection Tools
| Tool | Shortcut | Description |
|---|---|---|
| Select | M | Select rectangular area |
| Lasso | L | Freeform selection by drawing |
| Magic Wand | W | Select matching cells (by character, color, or background) |
Utility Tools
| Tool | Shortcut | Description |
|---|---|---|
| Eyedropper | I | Pick character and colors from canvas (hold Alt for quick access) |
| Flip H | (click) | Flip selection horizontally |
| Flip V | (click) | Flip selection vertically |
Tool Options
Each tool has specific options that appear below the tool buttons:
Brush/Eraser Options:
- Brush size (1-20, adjust with
[and]keys) - Brush shape (circle, square, horizontal, vertical)
- Affects toggles (character, text color, background color)
Shape Tool Options (Rectangle/Ellipse):
- Filled vs. outline mode
Fill Tool Options:
- Contiguous mode (fill only connected cells vs. all matching)
- Match criteria (character, text color, background color)
Gradient Tool Options:
- Contiguous mode
- Match criteria for area selection
Magic Wand Options:
- Contiguous mode
- Match criteria (character, text color, background color)
Bezier Tool Options:
- Character mode (Selection, Palette, or Autofill)
- Color mode (Current Color or Palette)
- Close shape toggle
- Stroke width and taper controls (for open paths)
Center Canvas
Canvas Settings Bar
The settings bar above the canvas provides quick access to canvas configuration:
Canvas Size:
- Mode Toggle - Switch between character count (
char) and pixel dimensions (px) - Width × Height - Adjust canvas dimensions with +/- buttons or direct input
- Character mode: 4-200 columns, 4-100 rows
- Pixel mode: Automatically calculates character count based on typography settings
Display Controls:
- Grid Toggle - Show/hide the alignment grid overlay
- Background Color - Click the color swatch to open the color picker (supports transparent)
- Typography - Opens typography settings panel
Typography Settings (via Type icon):
- Text Size - Font size from 8px to 48px
- Character Spacing - Horizontal spacing multiplier (0.5x to 2.0x)
- Line Spacing - Vertical spacing multiplier (0.8x to 2.0x)
- Font Family - Choose from bundled monospace fonts or system fonts
- Reset to Default - Restore all typography settings
Zoom Controls:
- Current zoom percentage display
- Zoom in/out buttons
Zoom Controls
| Action | Shortcut | Description |
|---|---|---|
| Zoom in | + or = | Increase zoom level |
| Zoom out | - | Decrease zoom level |
Zoom range: 20% to 400%
Pan (Move Canvas)
- Hold
Spaceand drag to pan the canvas - Useful when zoomed in to navigate around your artwork
Canvas Overlays
Selection Outline
- Marching ants animation shows selected area
- Purple highlight for active selection
Onion Skin (animation mode)
- Blue tint shows previous frames
- Red tint shows next frames
- Toggle with
Shift+O - Adjust number of frames shown in timeline controls
Cursor Preview
- Shows character and color that will be placed
- Displays brush size for brush/eraser tools
Right Properties Panel
The right panel contains collapsible sections for appearance, palettes, effects, and generators.
Appearance Section
Shows your current drawing style at a glance:
- Character Preview - Large preview showing active character with FG/BG colors applied. Click to open the full character picker.
- Color Selector - FG/BG color swatches. Click to open the color picker overlay.
- Color Readout - Displays current hex values for foreground and background.
Shortcuts:
X- Swap foreground and background colors
Character Palette Section
Manage character sets for quick access:
- Palette Dropdown - Switch between preset palettes (Basic, Blocks, Lines, Symbols, etc.) or your custom palettes
- Character Grid - Click to select, double-click to edit, drag to reorder
- Controls - Move left/right, add current character, delete, import/export palettes
Shortcuts:
Cmd+[/Ctrl+[- Previous character in paletteCmd+]/Ctrl+]- Next character in palette
Color Palette Section
Manage color swatches with Text and BG tabs:
- Palette Dropdown - Switch between preset palettes (ANSI, Monokai, etc.) or custom palettes
- Text Tab - Foreground color swatches (click to select, double-click to edit)
- BG Tab - Background color swatches (includes transparent option)
- Controls - Move colors, add current, delete, import/export
Shortcuts:
Shift+[- Previous palette colorShift+]- Next palette color
Effects Section
Apply non-destructive, procedural effects to layers, groups, or globally:
- Effect blocks on the timeline with configurable in/out points
- Keyframeable parameters for animated effects
- 8 effects in 4 categories: adjustment, mapping, filter, distortion
Generators Section
Create procedural content:
- Digital Rain - Matrix-style falling characters
- Noise Patterns - Random character distributions
- Gradients - Character-based gradient fills
Bottom Timeline
Layer-Based Composition
The timeline panel manages layers, content frames, keyframes, and effects:
| Area | Content |
|---|---|
| Layer List (left) | Layer names with visibility (eye), solo (S), lock, and delete controls. Expand layers to see property tracks and effect tracks. |
| Track Area (center) | Content frame blocks (draggable, resizable), property track keyframes (diamond markers), effect blocks, ruler with playhead |
| Properties Panel (right) | Keyframe editor with frame, value, easing curve controls (visible when a keyframe is selected) |
Playback Controls
| Button | Shortcut | Function |
|---|---|---|
| ⏮️ First | Shift+< | Jump to first frame |
| ◀️ Previous | , (comma) | Previous frame |
| ▶️ Play/Pause | Space | Play/pause animation |
| ▶️ Next | . (period) | Next frame |
| ⏭️ Last | Shift+> | Jump to last frame |
| 🔄 Loop | (click) | Toggle looping playback |
Layer Management
| Action | Shortcut | Description |
|---|---|---|
| Add layer | Shift+N | Add new layer |
| Add content frame | Ctrl+N / Cmd+N | Add new content frame after current |
| Duplicate frame | Ctrl+D / Cmd+D | Duplicate selected content frame(s) |
| Delete frame | Ctrl+Delete / Cmd+Backspace | Delete selected content frame(s) |
| Group layers | Ctrl+G / Cmd+G | Group selected layers |
Content Frames
Content frames appear as colored blocks on each layer's track:
- Click to select, Shift+click for multi-select
- Drag edges to resize duration
- Drag block to reposition or move to another layer
- Right-click for context menu (split, duplicate, hide, label color)
Keyframes
Expand a layer to reveal property tracks (Position X/Y, Scale X/Y, Rotation, Anchor X/Y):
- Click on a track at a frame to add a keyframe
- Drag diamond markers to move keyframes
- Alt+drag to duplicate keyframes
- Select a keyframe to open the easing curve editor
Timeline Footer
- Work area buttons — Set Start, Set End, Clear (constrain playback range)
- Zoom slider — Adjust timeline zoom level
- Timecode format — Frames, seconds, timecode (SS:FF), or milliseconds
FPS Control
Frame rate slider (1–60 FPS) in the timeline toolbar. Default is 12 FPS.
Keyboard Shortcuts Quick Reference
Access the complete keyboard shortcuts reference from the hamburger menu → Keyboard Shortcuts.
Tool Selection
| Shortcut | Tool |
|---|---|
B | Brush |
E | Eraser |
F | Fill |
G | Gradient Fill |
M | Rectangle Select |
L | Lasso Select |
W | Magic Wand |
I | Eyedropper |
R | Rectangle |
O | Ellipse |
T | Text |
Y | ASCII Type |
Q | ASCII Box |
P | Bezier Pen |
Canvas Actions
| Shortcut | Action |
|---|---|
Cmd+A / Ctrl+A | Select All |
Cmd+C / Ctrl+C | Copy Selection |
Cmd+V / Ctrl+V | Paste Selection |
Cmd+Z / Ctrl+Z | Undo |
Cmd+Shift+Z / Ctrl+Shift+Z | Redo |
Delete / Backspace | Delete selected cells |
Esc | Clear selection |
Color & Brush
| Shortcut | Action |
|---|---|
X | Swap foreground/background colors |
[ | Decrease brush size |
] | Increase brush size |
Alt (hold) | Temporary eyedropper |
Ctrl (hold with Brush) | Temporary eraser |
View & Zoom
| Shortcut | Action |
|---|---|
+ or = | Zoom in |
- | Zoom out |
Space (hold) + drag | Pan canvas |
Animation
| Shortcut | Action |
|---|---|
, (comma) | Previous frame |
. (period) | Next frame |
Shift+< | First frame |
Shift+> | Last frame |
Space | Play/Pause animation |
Shift+N | Add new layer |
Cmd+N / Ctrl+N | Add content frame |
Cmd+D / Ctrl+D | Duplicate frame |
Cmd+Delete / Ctrl+Backspace | Delete frame |
Cmd+G / Ctrl+G | Group layers |
J / K | Previous/Next keyframe |
U | Expand/collapse layer tracks |
Shift+O | Toggle onion skinning |
File Operations
| Shortcut | Action |
|---|---|
Cmd+S / Ctrl+S | Save to cloud |
Cmd+Shift+S / Ctrl+Shift+S | Save As... |
Cmd+O / Ctrl+O | Open from cloud |
Customizing Your Workspace
Theme Selection
Click the sun/moon icon in the top-right to switch between:
- Light Mode - Bright, high-contrast interface
- Dark Mode - Easy on the eyes, default theme
Your preference is saved automatically.
Project Settings
Access via hamburger menu → Project Settings:
- Canvas size - Width and height in cells
- Background color - Default canvas background
- Grid visibility - Show/hide the grid overlay
Tips for Efficient Workflow
-
Learn the essential shortcuts -
Bfor brush,Efor eraser,Spacefor play/pause, and[/]for brush size will speed you up significantly. -
Use modifier keys - Hold
Altfor quick eyedropper, holdCtrlwith brush for quick eraser. -
Zoom for precision - Press
+multiple times to zoom in for pixel-perfect editing. -
Save custom palettes - If you use the same colors or characters often, save them as a palette.
-
Use onion skinning - Press
Shift+Owhen animating to see previous/next frames as guides. -
Multi-select frames -
Cmd/Ctrl+clickto select multiple frames for batch operations like duplicate or delete.
Responsive Layout
The interface adapts to your screen size:
Desktop (1920×1080+)
- All panels visible
- Maximum canvas space
- Timeline expanded
Laptop (1366×768)
- Panels may be more compact
- Full functionality maintained
Tablet/Mobile
ASCII Motion is optimized for desktop use with keyboard and mouse. Tablet support is limited, and mobile phones are not recommended for editing.
Accessibility Features
ASCII Motion includes accessibility features:
Keyboard Navigation
- Full keyboard control for all tools and operations
- Tab through controls
- Escape to cancel/clear selections
Visual Options
- Light and dark mode
- High contrast tool highlighting
Next Steps
You now know your way around the editor. Time to create!
Explore next:
- Drawing Tools - Master each tool in detail
- Animation Guide - Create frame-by-frame animations
- Tutorials - Follow step-by-step projects
Quick Start:
- Press
Bto select the brush - Choose a character and color from the right panel
- Start drawing on the canvas!
- Press
Cmd+N/Ctrl+Nto add frames for animation
Need help? Access keyboard shortcuts from the hamburger menu, or contact support@ascii-motion.com